Finding Your PC’s IP Address

There’s a quick way to see your own PC’s IP address, and it doesn’t matter what other screens you may have open. Just press the “Windows” button on the keyboard (on some keyboards there are two of them, left and right at the bottom row) and the “R” key simultaneously. This brings up a small dialog window with a space to type in. If there is a program name or location highlighted in that space already, just start typing and you’ll replace it. You type in “cmd” in upper or lower case, and hit enter or click on “OK.”

Now you get a black-background window with a drive letter (“C:\” most likely) and probably a directory location like “Users\Username>” The curser will be flashing at the end of it.

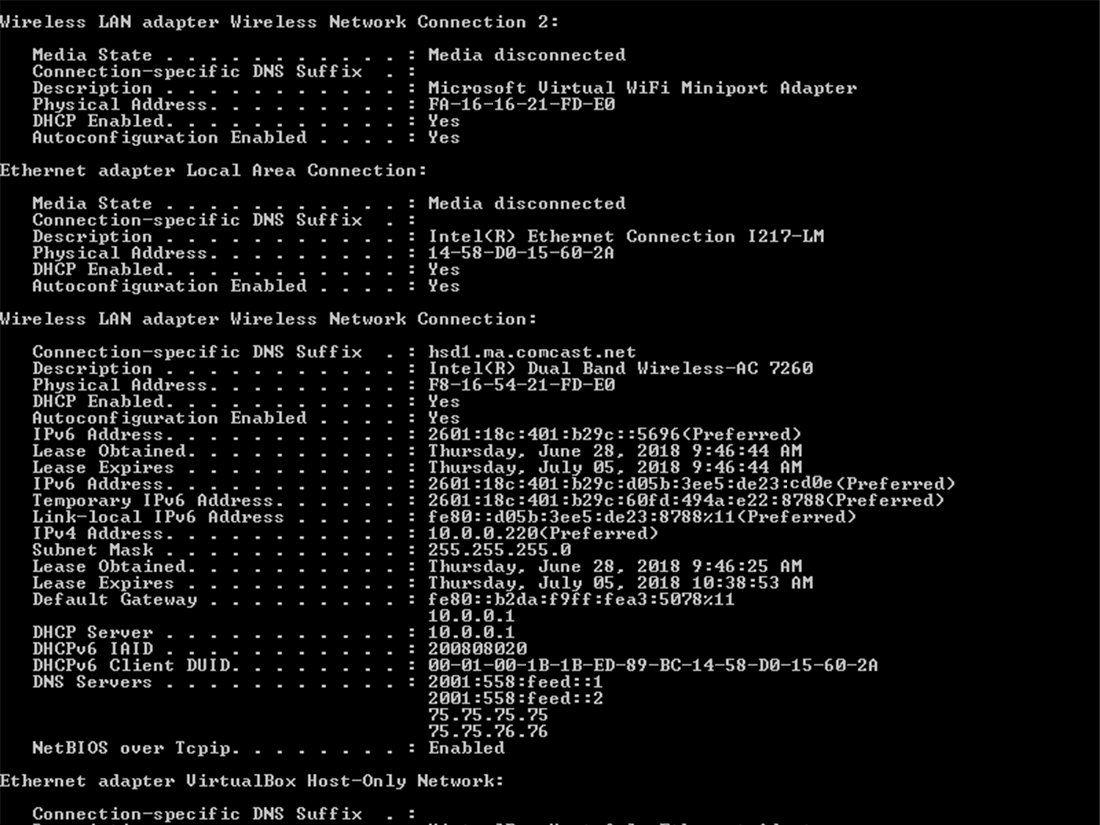
Now, type in “ipconfig” (no quote marks) and hit . A bunch of data will scroll down in the black space. Scroll back to the top of it all and your IP address will display at the end of a line that starts: “IPv4 Address. . . . : 192.168.1.110, or some other string of number groups separated by periods, or “dots.” Whatever your numbers are, (in place of these red example numbers) that is your “IP.”

You can enter exactly this string (your exact string) in place of your computer’s name on the set-up page for SMB scanning in your copier/scanner.

Finding Your PC’s Network Name

FINDING THE NETWORK NAME OF YOUR COMPUTER

If the IT department or consultant hasn’t pasted the name on the side of your computer, you can find the correct name quite easily. First, find your “Start” circle or rectangle in some corner of your screen (usually lower-left) and click it.

This brings up the listing of programs on your PC on the left side of the small window, and a grayish column on the right with about 10 items. One item is “Computer.”

Right-click on the word, “Computer” and in the small dialog that appears find “Properties” and click on that.

This produces a larger dialog window. Scroll down a couple of inches and you’ll see a grouping that includes “Computer Name” and below it, probably, “Full Computer Name.” These should be exactly the same, but if the Full Computer Name is different, use everything of that up to the first period, but not the period itself. Some networks have domain names that are part of the Full Computer Name. Most copier set-ups don’t want this part of the name; there may be some that do and you’ll have to ask your copier person or IT if that is needed for that brand.

You can highlight the name, copy and paste it into the set-up field in the copier’s web-page.

SOMETIMES the name of your computer won’t work in the same way the name of the copier might not, and you will want to use the IP address of the computer instead. Find your PC’s IP address.

Finding Your Copier IP Address

FINDING YOUR COPIER’S “IP” ADDRESS

Your copier/MFP/scanner may have a screen that displays the “IP.” Most users have never tried to find it so that can be awkward. There may be a counter (meter) report that includes the IP address, and this is usually easy to access and print if you provide meter readings to your service company.

But, you can also find your copier’s IP right on your PC. To do this you want to open the “Printers Window” or folder, where all the printers and devices you have access to are listed. It may be a chart of icons that look sort of like printers or copiers. When you get there, RIGHT CLICK on the copier/MFP you will be scanning FROM. It may or may not be your default printer – doesn’t matter.

When you right-clicked you got a “pop-up” menu in which the 4th or 5th item down is called “Printer Properties.” If you are looking at Windows 7, or later versions, there may be a second item at the bottom of the menu that says, simply, “Properties.” That one won’t help you; be sure it says Printer Properties. Click on that one with a normal click. (If you are on Windows XP, there is only the “Properties” item at the bottom – click on that for XP.)

As you can see to the right, there is a new “dialog” window that has tabs across the top and one of them (3rd from left) is “PORTS.” Normal-click that tab.

There are probably several “ports,” including “LPT1” and others, plus one or more “IP” ports and “USB” ports. Unfortunately, the list of ports is in a small window, but there is a scroll-bar on the bottom to pan left and right.

There is an up/down scroll bar on the right, as well, IF you have lots of ports. Scroll down until you see the NAME of the machine you want on the right side of the window area. The PORT information is on the left-most segment of this line.

You won’t be able to see it right away because Windows politely covers it up with the left-right scroll bar. Scroll down one more line so that it’s fully visible.

Now, place your mouse curser on the faint gray divider between the “Ports” column and the “Description” column: it will change into a double arrow. “Drag” the line toward “Description” and the “Ports” column will widen to where you can see the whole IP address, OR you may see a string of letters and numbers that comprise the NETWORK NAME of the copier/scanner. If it is an IP address you will see 4 groups of up to 3 numbers each, separated by “dots,” which is to say, periods. Write down the IP or the string of mixed characters (which may actually spell something). It is that set of numbers and dots or the name string that is the identity of the COPIER (port) by which the copier/scanner can communicate to computers on the network, including yours.